

When studying OOP, you hear “encapsulation” countless times, but when someone asks, “So how do you do it in code?”, you can suddenly go blank. You understand the concept, but your hands do not know what to write.
In short, encapsulation means hiding an object’s internal data so it cannot be modified freely from outside, and allowing access only through defined paths. In Swift, this is implemented with access modifiers.
Today, we’ll examine all five levels of access control, including private and internal, through real code and see how information hiding protects your code.
What Exactly Is Encapsulation?
Encapsulation is one of the four fundamental characteristics of OOP.
In one sentence:
Bundling data and the functionality that operates on it together, while hiding the internals and exposing only what is necessary.
Why hide it?
A bank account makes this easy to understand. It would be a disaster if anyone could directly change the balance to any number.
Deposits and withdrawals must follow defined procedures, with rules such as “you cannot withdraw more than the balance” enforced along the way.
Preventing direct access to internal values and exposing only validated paths is called information hiding.
If encapsulation is the broader concept, information hiding is the core principle that puts it into practice.
A Quick Comparison of Swift’s Five Access Levels
Swift divides access scope into five levels. Here they are in order from narrowest to broadest.
(Based on the latest Swift syntax as of 2026.)
| Access modifier | Accessible scope | Typical use |
|---|---|---|
private |
Inside the braces of the declaring block | Internal state you really want to hide |
fileprivate |
The entire source file | Collaborating types in one file |
internal |
The entire module (app/framework) | The default; most code |
public |
Usable from other modules | Public API outside a library |
open |
Inheritance and overriding from other modules | Framework extension points |
Here is one point you should remember.
If you specify nothing, internal is the default.
That is why code worked normally within the same app even when you did not explicitly write an access modifier.
The difference between public and open is also easy to confuse. Only open allows inheritance and overriding from another module. public can be used there, but inheritance is blocked.

Achieving Real Information Hiding with private
An account example will make this clearer than words alone.
First, let’s look at a bad example without encapsulation.
class BadAccount {
    var balance: Int = 0   // Anyone can modify it from outside
}

let acc = BadAccount()
acc.balance = -99999      // Even nonsensical values go in unchecked
print(acc.balance)
// Output: -99999
A balance of negative 90,000? The rules have completely collapsed.
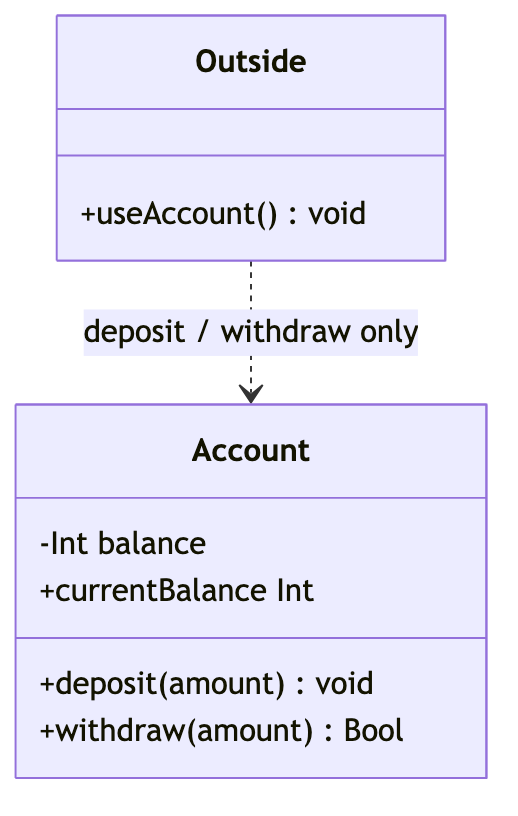
Now we’ll hide the internal state with private and expose only the deposit and withdrawal paths.
class Account {
    private var balance: Int = 0        // Block external access

    func deposit(_ amount: Int) {
        guard amount > 0 else { return }
        balance += amount
    }

    func withdraw(_ amount: Int) -> Bool {
        guard amount > 0, balance >= amount else { return false }
        balance -= amount
        return true
    }

    var currentBalance: Int { balance }  // Allow reading only
}

let myAccount = Account()
myAccount.deposit(10000)
print(myAccount.withdraw(30000))  // Insufficient balance
// Output: false
Now balance cannot be modified directly from outside.
Code such as myAccount.balance = -99999 now produces a compile error.
Money can move only through deposit and withdraw, where the validation rules are firmly enforced.
That is the power of information hiding: it prevents code that violates the rules from being written in the first place.
private(set) — Allow Reading, Prevent Writing
Let’s make this a little more practical.
It is very common to want to allow values to be read from outside while preventing changes.
You can create a separate computed property as above, but Swift provides a cleaner option.
class ScoreBoard {
    private(set) var score: Int = 0   // Read public, Write private

    func addPoint() {
        score += 10
    }
}

let board = ScoreBoard()
board.addPoint()
print(board.score)   // Reading is unrestricted
// Output: 10
// board.score = 999  // This line causes a compile error
Adding private(set) leaves reading open while restricting write access to the inside.
Since the score can increase only through addPoint(), you can prevent game logic outside the system from manipulating it.
I use this syntax often because there is no need to create a computed property.
Which Access Modifier Should You Use?
Here are the practical guidelines I rely on when access control gets confusing.
- Start with
private. Expanding the scope when needed is safer than opening it broadly and narrowing it later. - The default
internalworks well for most app code. There is no need to specify everything explicitly. public·openare worth considering when building libraries or frameworks for others to use.- Use
openonly when you want to allow inheritance as well as . Otherwise,publicis enough.
| Situation | Decision |
|---|---|
| State variable used only internally | private |
| Want to allow reading from outside only | private(set) |
| Freely within the same app | internal (default) |
| Expose publicly as a library | public |
| Allow inheritance and overriding externally | open |
Remember one thing: access scope should generally be opened as narrowly as possible.
How This Comes Up in Interviews
Q. What is the difference between encapsulation and information hiding?
Encapsulation is a design concept that bundles data and methods into one object, while information hiding is the principle of hiding the internal implementation from the outside. A concise answer is that encapsulation is the larger container, and information hiding is realized within it through access modifiers.
Q. What is the difference between public and open in Swift?
Both are accessible from other modules, but only open allows inheritance and method overriding from an external module. public classes can be used externally, but cannot be subclassed. It is worth adding that open is used only when opening extension points for a framework.
Access modifiers may look like a few syntax rules you can memorize, but they actually train you to design who is allowed to touch a given value.
Try typing the account example from today yourself and it will click. I recommend starting by adding private in a small project!